

I’ve decided to use one of my raised beds to grow garlic this fall. Since this is my first time growing garlic, we’ll learn together if you’ve never grown it either. Planting garlic in one of your beds is a commitment to space because garlic planted in the fall will be harvested in the summer.

Tips on Growing Garlic.
- Choose the biggest and healthiest garlic bulbs you can find. Feel of the bulb and be sure the cloves are not soft.
- Choose the garlic type that is best grown in your area. Since I live in the South, the “soft-neck” garlic is what is recommended for my garden. Soft neck garlic has more bulbs than “hard-neck” varieties but they are smaller. They store well, and the soft stems can be braided.
- Hard-neck garlic is best suited for cooler climates. Their cloves are larger but fewer on the bulb. They do not store as long as the soft-neck. The hard neck variety will give you garlic scapes.
- Each type has many varieties, so when you are deciding which garlic you want to plant, you may want to look at storage, flavor, or bulb size, according to your likes.
- I chose Early-California. It is a soft neck variety that is easy to grow, medium size, with a nice mild flavor. It also has excellent storage ability, and is probably the most commonly grown in the U.S.
- Purchase garlic that is sold for planting. I know people who have grown garlic from supermarket garlic, but some has been treated with a sprout inhibitor to keep it from growing.

- Plant garlic in full sun.
- Garlic should be planted in well drained, rich soil, a few weeks before your first frost date and the ground freezes. My first frost date ranges from the last two weeks of October to November 1st. If you do like I did and order it too early, (because I couldn’t find any in the nurseries here, and was told they did not know whether they would get any), you don’t want to store in the refrigerator, or it will start sprouting. My garlic is downstairs in my basement office which stays cool, and I run a dehumidifier. Optimum storage 60-70 degrees, low humidity.
- Pull all the cloves apart from the bulb, but leave the outer skin attached to help to keep it from rotting. Choose the largest bulbs, the small bulbs take up as much space, but won’t give you as big of a bulb.
- Amend the soil with plenty of compost prior to planting. It will help with drainage, and is a good source of your initial fertilizer. Garlic is a heavy feeder, so incorporating a well balanced fertilizer into the soil prior to planting is beneficial. Careful with high nitrogen fertilizer or you will get lots of top growth and small bulbs.
- Dig a hole 3-4 inches deep in soil that has been loosened to 8 inches. My raised bed is 16 inches deep. Place the clove flat side down, pointy side up. Plant 6-8 inches apart. Mulch with straw or leaves. Using a garden tool called a “dibbler” makes it easier to plant your garlic at the right level.
- Water gently and every 5 or 6 days if it does not rain, until they are established. Don’t over water or you may rot the bulbs. After that, you don’t need to water during the winter months when it is covered with mulch. If you have a dry spring you can water every 7-10 days. Garlic needs the hot, dry summer weather to mature.
- After the growth reaches about 6-8 inches you can side dress with an organic nitrogen fertilizer such as blood meal.
- Stop watering about 1 month before your expected harvest. Harvest in my area is around July.
Here’s a video link last year after planting. Video
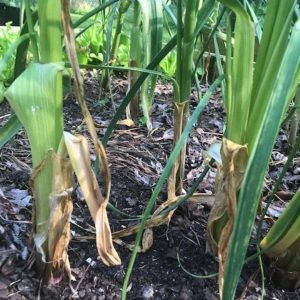
UPDATE: My garden harvest July. Garlic is ready to harvest when the bottom leaves start to turn brown.
Once you have harvested the garlic just shake the dirt off, and I trimmed the roots. Next I hung the garlic, stems and all in my garden shed that is dry and dark, but the windows are open for circulation.
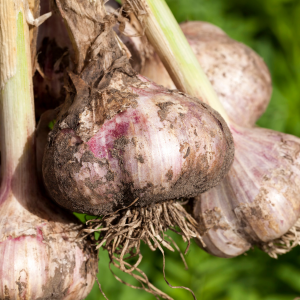

These are some of the cloves after they cured for several weeks. I washed the dried dirt off and removed any dirty outer layer skin.
Garlic is one of the easiest crops you can grow, and garlic you purchase in the store cannot compare to garlic you have grown in your own garden, so I hope, if you haven’t already, give garlic growing a try.
Happy Fall!
Happy Gardening,
Karen
Be sure an sign up for the newsletter. You can find the sign up form on the blog. After signing up you will receive my free gift to download “attracting beneficial insects to the garden ” . You don’t want to miss any great garden info, recipe, printable or news on Gardenchick offers! You’ll also want to join the Gardenchick Facebook Group. Share your love of gardening with a great group of like minded people. Join here!
If you enjoy my post please share this pin with others on Pinterest.
*Disclaimer: I am an amazon affiliate. ANYTHING you purchase when you click on the planting dabber or gardening book link will provide me a small compensation. This helps me to keep bringing you great gardening info.