

I’ve always admired those little teacup gardens featured in magazines and shops, so I decided to make one myself. You can purchase a new teacup or find beautiful, affordable options at thrift stores. I prefer ones with saucers so I can decorate the entire set. When I spot a good deal, I buy several for the fairy garden classes that I teach locally.
Fairy garden figures and accessories can get pricey, so I’ve sourced mine from places like Dollar Tree and Hobby Lobby. Thrift stores are also great for finding unique items like small, mismatched salt and pepper shakers or figurines. And remember, your teacup garden doesn’t have to feature just gnomes or fairies! If you or someone you want to make one for has a special hobby, create one with that themed. You’re only limited by your own imagination.
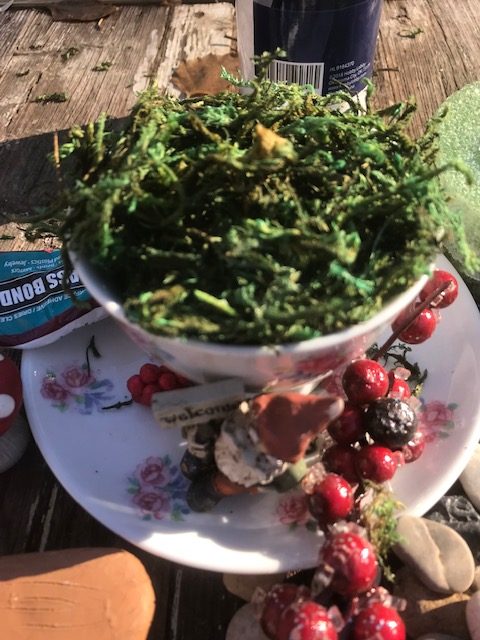
Since it’s winter, I had the perfect idea for a Christmas-themed teacup garden! To create your own, start by selecting a festive teacup—think holiday colors, snowflakes, or even a simple classic design. Fill the cup with soil or floral foam as the base. Then, decorate it with small items like miniature Christmas trees, tiny wrapped presents, snowmen figurines, or even a little Santa Claus. Add faux snow or sparkly white sand for a magical touch, and use the saucer to expand your scene with more holiday decor like the berries I used.
As a gardener and lover of gnomes , I couldn’t wait to get started on my teacup crafting. These little gardens make adorable decorations or heartfelt gifts for the holiday season!
What materials do you need for a teacup fairy garden?
You don’t have to have all of these, just what you need to create yours.

- Tea cup and saucer
- Figures including fairies, gnomes, animals. Holiday theme figures and accessories such as fences, paths, trees, flowers, rocks, colored glass rocks, gates, birdhouses, birdbaths, signs, gardening tools etc. Anything you would want in your garden.
- Artificial flowers, berries, snow, moss, small ornaments.
- Floral foam. Both the Hobby and Dollar Tree both have foam in the shape of a teacup. You may need to trim to fit into the cup.
How do you create a teacup fairy garden?
- Gather all of your supplies.
- Cut the Styrofoam so that it will fit into your cup.
- I used styrofoam glue on top of the insert.
- Glue your moss on top and tuck down between the foam and cup to cover.
- Next, I place my main figure, like my gnome, in place then add my accessories before I glue them down. I often change them around. Glue your main figure down first. I use glass/ceramic and hard plastic glue. E-6OOO Glue is a good choice.
- Start adding your pieces with the highest piece in the back. I like to have at least 3 pieces, then start adding rocks, paths, and other extras to your cup. Scatter the snow around to make it look natural.
You can decorate the saucer with some berries, moss, ornaments, or like I did, with a mushroom. The glass/ceramic/and hard plastic glue will keep the mushroom in place. If you want to use the teacup again, you can place the accessories on the saucer.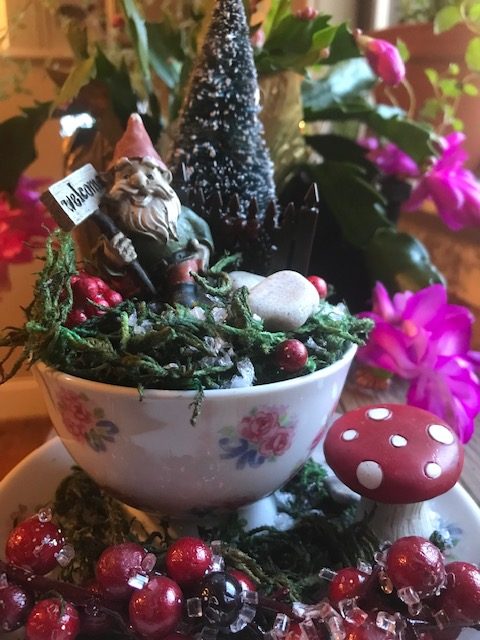
These little teacups can be used all winter long to brighten your home. You are only limited by your imagination.
Happy Gardening!
Karen
You may enjoy these other winter crafts using vintage finds.
Forcing Spring Bulbs for Winter Color I used one of my vintage coffee tins.
Rusty Bedspring Snowman Grab a rusty bedspring and add a snowman head ornament and a few buttons.
Happy Gardening!
Karen
[…] look for everyday items to use—pebbles can become pathways, a bottle cap can become a pond, and an old teacup might make the perfect fairy […]